Master Chili Oil: Unlock Layered Flavor with Perfect Oil Temperature
Forget settling for store-bought. If you're looking to elevate your culinary game and introduce an explosion of complex, aromatic heat into your dishes, mastering
how to make chili oil at home is an absolute must. While many recipes focus solely on ingredients, the true secret to creating a restaurant-quality condiment with deeply layered flavor lies in one often-overlooked factor: precise oil temperature. Get it right, and you’ll unlock an unparalleled depth that transforms everything from noodles to eggs, salads, and more.
Why Homemade Chili Oil is a Game Changer
There's a common misconception that premium chili oil must be purchased from specialty stores. However, as culinary experts like recipe developer Juliana Hale attest, "There is no reason to buy chili oil. It’s so easy to make — and you will use it more than you might think!" The truth is, your homemade version will almost always surpass its commercial counterparts in every measurable way.
The magic of chili oil resides in its infusion process. Hot oil, when heated to the correct temperature, meticulously extracts capsaicin, vibrant color, and the delicate essential oils from dried chilies and aromatics. This creates a fundamentally different experience than hot sauce; the heat is rounder, more nuanced, and builds gradually, allowing other flavors to shine through.
When you make chili oil yourself, you gain complete control over every variable, ensuring a superior product:
*
Unrivaled Freshness: Toasting your own spices and infusing them immediately captures volatile aromatics that are often lost during commercial processing and prolonged shelf storage.
*
Tailored Customization: Want a gentle warmth or a fiery kick? You dictate the intensity by adjusting chili ratios or even combining different types of peppers. Beyond heat, you can experiment with a vast array of spices to create truly unique flavor profiles.
*
Ingredient Transparency: Say goodbye to questionable preservatives, stabilizers, and generic "natural flavorings" that often mask cheaper shortcuts in store-bought brands. With homemade chili oil, you know exactly what goes in.
*
Cost-Effectiveness: A single batch of homemade chili oil typically costs a mere fraction of what you’d pay for a premium store-bought jar (think popular brands like Lao Gan Ma), yet yields 1 to 1.5 cups of superior quality.
While store-bought options often rely on less flavorful soybean oil and added stabilizers for consistency, they invariably sacrifice the vibrant nuance and complex character that fresh, home-infused oil delivers. To dive deeper into the benefits, read our related article:
Homemade Chili Oil Wins: Better Taste, Cheaper Than Store-Bought.
The Essential Ingredients for Unlocking Layered Flavor
Building a truly exceptional chili oil begins with a carefully selected array of simple, yet potent, ingredients. These pantry staples work in harmony to create a symphony of taste and aroma:
*
Neutral Oil (1 cup): This forms the foundational canvas for your infusion. Opt for a neutral-flavored oil such as peanut, vegetable, or canola. These oils allow the star flavors of the chilies and spices to shine without introducing competing notes.
*
Crushed Red Pepper (3 tablespoons): The heart of your chili oil's heat and color. While standard red pepper flakes are a great starting point, consider exploring different varieties for varying heat levels and fruitiness.
*
Aromatic Spices for Depth:
*
Cinnamon Stick (1 whole): Lends a warm, subtly sweet, and inviting aroma that complements the heat beautifully.
*
Star Anise (1 whole): Provides a distinct licorice-like, warm, and slightly bitter note, crucial for authentic Asian flavor profiles.
*
Szechuan Peppercorns (1 teaspoon, crushed): These are non-negotiable for a truly authentic Chinese-style chili oil. When crushed, they release their signature "mala" (numbing-spicy) sensation, adding an unparalleled earthy complexity and buzz.
*
Granulated Garlic (1/2 teaspoon): Rather than fresh garlic which can burn easily, granulated garlic offers a consistent, savory depth and umami boost that enhances the overall flavor profile without overwhelming it.
While this selection provides a robust and classic Sichuan-style foundation, don't hesitate to experiment once you've mastered the basics. Ingredients like bay leaves, dried orange peel, or even a touch of ginger can further customize your creation.
Mastering the Temperature: The Secret to Layered Heat
This is where your homemade chili oil truly distinguishes itself. Many recipes gloss over the importance of oil temperature, but it is, without exaggeration, the single most critical factor in achieving a condiment with layered heat, perfectly toasted aromatics, and restaurant-level depth.
The goal is a controlled infusion, not a quick fry. If the oil is too cool, it won't extract enough flavor or color from the chilies and spices, resulting in a bland, uninspired oil. Conversely, if the oil is too hot, it will instantly scorch the delicate aromatics, producing a bitter, acrid taste and an unpleasant smell.
The sweet spot for infusion lies between
225°F and 250°F (110°C to 120°C). At this precise range:
*
Gradual Capsaicin Release: The heat from the oil gently coaxes out the capsaicin, ensuring a smooth, complex heat that builds rather than hitting you with an immediate, overwhelming burn.
*
Perfect Toasting of Spices: The aromatics like Szechuan peppercorns, cinnamon, and star anise are perfectly toasted, releasing their volatile oils and deep flavors without burning. This creates the foundational warmth and complexity.
*
Vibrant Color Extraction: The red pepper flakes infuse their brilliant color into the oil, resulting in that iconic, enticing crimson hue.
A reliable kitchen thermometer is your best friend here. While the traditional "sizzle test" (dropping a few pepper flakes into the oil to see if they sizzle gently) can give you a rough idea, a thermometer guarantees precision. This precision is what transforms a good chili oil into an extraordinary one. For more detailed insights on achieving this perfection, check out our companion article:
Easy Homemade Chili Oil: Restaurant-Quality Flavor From Scratch.
Step-by-Step Guide: How to Make Chili Oil Perfection
Ready to embark on your chili oil journey? Follow these steps for a perfect batch every time:
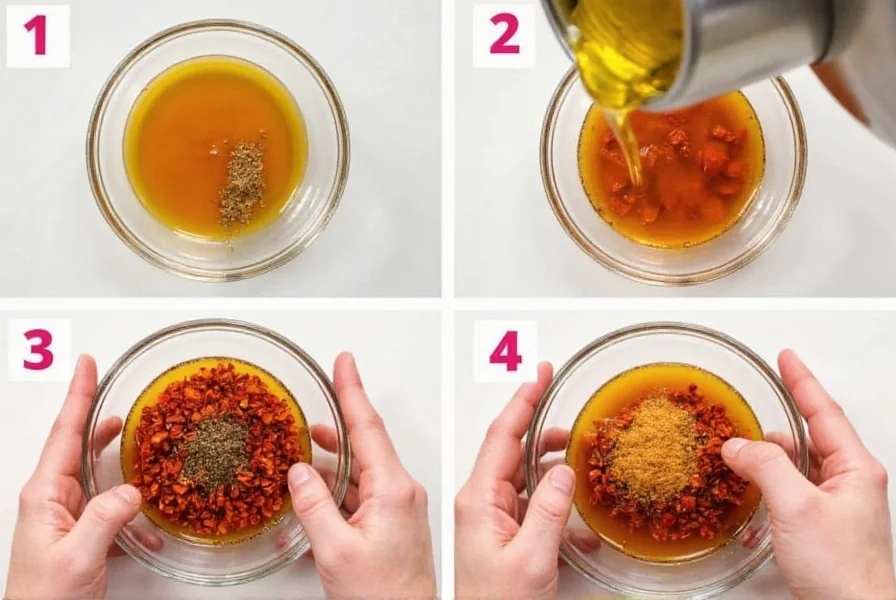
1.
Gather and Prepare Your Ingredients:
* Measure out 3 tablespoons of crushed red pepper, 1 whole cinnamon stick, 1 whole star anise, 1 teaspoon of crushed Szechuan peppercorns, and 1/2 teaspoon of granulated garlic.
* Combine all these dry ingredients in a heatproof bowl. Stainless steel, ceramic, or thick glass bowls work best as they can withstand the hot oil. Ensure your bowl is completely dry.
2.
Heat the Oil Precisely:
* Pour 1 cup of your chosen neutral oil (peanut, vegetable, or canola) into a small saucepan.
* Place the saucepan over medium heat. Allow the oil to heat for approximately 3 to 4 minutes.
* The crucial step: Use a thermometer to monitor the oil temperature. It should reach between
225°F to 250°F (110°C to 120°C). If you don't have a thermometer, drop a few flakes of crushed red pepper into the oil; they should sizzle gently, not furiously burn. This gentle sizzle indicates the perfect temperature.
3.
The Infusion Pour:
* Carefully and slowly pour the heated oil directly over the spice mixture in your heatproof bowl. You’ll immediately hear a satisfying sizzle and be greeted by an incredible aroma as the spices begin to infuse.
* Gently stir the mixture to ensure all the spices are submerged and fully coated by the hot oil.
4.
Allow to Infuse and Cool Completely:
* This is a critical step for maximum flavor extraction. Let the chili oil stand undisturbed at room temperature until it has cooled completely. This typically takes about 1 hour, but can be longer depending on your environment. As it cools, the flavors will continue to meld and deepen.
5.
Strain (Optional, but Recommended for Purity):
* If you prefer a clear chili oil, once cooled, strain the oil through a fine-mesh sieve into a clean, airtight jar. This removes the solid aromatics, leaving behind a smooth, infused oil.
* If you enjoy the textural element and continuous flavor boost, you can leave some or all of the spices in the oil. The remaining solids can be delicious to scoop up with food!
6.
Store and Enjoy:
* Label your jar with the date it was made.
* Store your homemade chili oil in the refrigerator for up to 6 months. For best results and to prevent spoilage, always use clean utensils when handling the oil.
Elevating Your Chili Oil: Customization & Regional Variations
The beauty of homemade chili oil extends far beyond the basic recipe. Once you've mastered the fundamentals, you can begin to explore a world of flavor through customization. Consider delving into regional variations as inspiration:
*
Sichuan Style: (As provided in our recipe) Emphasizes the unique "mala" (numbing-spicy) sensation from Szechuan peppercorns, alongside star anise, cinnamon, and sometimes bay leaves. Perfect for dishes like Dan Dan noodles or Mapo Tofu.
*
Korean-Inspired Style: Often features Gochugaru (Korean chili flakes), garlic, ginger, and green onions for a sweeter, smokier, and fruitier heat. Fantastic with dumplings or Bibimbap.
*
Southeast Asian Style: Might incorporate lemongrass, shallots, soy sauce, and black vinegar, yielding a tangy, aromatic brightness ideal for rice dishes or spring rolls.
Don't be afraid to experiment with different types of dried chilies – from mild Ancho to fiery Habanero – or introduce other aromatics like dried mushrooms, ginger slices, or even a touch of sesame seeds for added texture and nutty flavor. Adjust the heat by increasing or decreasing the amount of crushed red pepper, or by adding a few whole dried chilies during the infusion process.
Conclusion
Making your own chili oil is not just a cooking task; it's an incredibly rewarding culinary journey that unlocks a whole new dimension of flavor for your kitchen. By understanding and controlling the oil temperature, you move beyond simple heat, creating a complex, aromatic condiment that’s infinitely superior to anything you can buy. With everyday ingredients and a little patience, you can master the art of homemade chili oil, transforming your dishes and delighting your palate. So gather your spices, heat that oil, and prepare to elevate your cooking to restaurant-quality levels – one sizzling drop at a time!