Are you ready to transform your culinary creations with a condiment that delivers a punch of flavor, depth, and a customizable heat? Many of us reach for a bottle of chili oil at the grocery store, but what if we told you that the secret to superior taste and significant savings lies in your own kitchen? Learning how to make chili oil at home is a simple yet incredibly rewarding endeavor that will elevate your cooking to new heights, far surpassing anything you can buy pre-made.
Recipe developer Juliana Hale perfectly sums it up: "There is no reason to buy chili oil. It’s so easy to make — and you will use it more than you might think!" This article will guide you through the process of crafting your own homemade chili oil, revealing why it's not just a budget-friendly alternative but a flavor powerhouse that will become a staple in your pantry.
Why Homemade Chili Oil Reigns Supreme: Flavor, Freshness & Your Wallet
The distinction between homemade and store-bought chili oil is vast, akin to comparing a fresh, artisanal bread to a mass-produced loaf. When you make chili oil yourself, you unlock a world of freshness, customization, and unparalleled flavor complexity that commercial versions simply cannot match.
Unmatched Freshness and Flavor Complexity
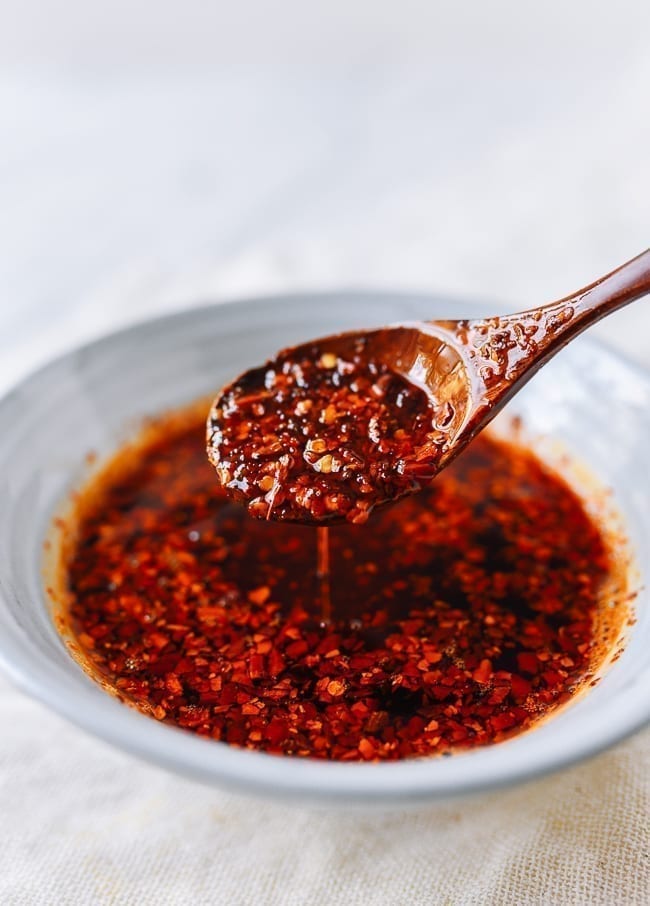
The "magic" of chili oil isn't just about heat; it's about a rich, aromatic infusion. By pouring heated oil over dried chili peppers and a carefully selected blend of aromatics, you initiate a process where the hot oil extracts capsaicin, essential oils, and vibrant color. This creates a condiment fundamentally different from hot sauce, offering a heat that is rounder, more complex, and builds gradually, rather than hitting with an immediate, one-dimensional burn.
Homemade chili oil allows you to use the freshest spices, which, when toasted, release volatile aromatics that are often lost during commercial processing and prolonged shelf storage. This results in layers of flavor – from savory and earthy to subtly sweet and intensely fragrant – that are impossible to achieve in mass production environments where uniformity often trumps nuance.
Customization and Ingredient Control
One of the most compelling reasons to learn how to make chili oil is the absolute control it gives you over every single variable. Want a gentle warmth that tingles the palate? You can adjust the chili ratios. Craving a face-melting intensity? Amp up the heat with hotter chili varieties. Beyond heat, you can tailor the aromatic profile to your exact preferences, experimenting with different spices and flavor enhancers.
Moreover, making chili oil at home means you skip the preservatives, stabilizers, and cryptic "natural flavoring" labels that often hide cheap shortcuts in store-bought brands. Many commercial chili oils rely on less flavorful soybean oil and add stabilizers for consistency, sacrificing the delicate balance and depth of flavor you can achieve with fresh, quality ingredients.
A Frugal Gourmet's Secret
Beyond the superior taste, homemade chili oil is a remarkably economical choice. A single batch, yielding 1 to 1.5 cups, costs a mere fraction of what you'd pay for premium brands like Lao Gan Ma. Considering how frequently you'll find yourself reaching for this versatile condiment once you discover its potential, the cost savings quickly add up, making it a smart move for any budget-conscious food lover.
The Essential Ingredients for Restaurant-Quality Chili Oil
Crafting exceptional chili oil doesn't require a specialty store; many of the core ingredients are likely already in your pantry. The beauty lies in the simple combination and the infusion process.
- Crushed Red Pepper: This forms the fiery heart of your chili oil, providing both heat and vibrant color. Start with three tablespoons, but feel free to adjust to your preferred spice level.
- Cinnamon Stick and Star Anise: These whole spices are game-changers, lending warm, sweet, and complex notes that elevate the oil far beyond mere heat. They provide a foundational aromatic depth common in Sichuan-style chili oils.
- Sichuan Peppercorns: Crucial for an authentic Chinese flavor profile, these crushed peppercorns introduce a unique "mala" (numbing-spicy) sensation, along with earthy and citrusy undertones that add incredible complexity.
- Garlic: Granulated garlic is often preferred for its ease of use and consistent flavor, infusing the oil with a savory, pungent depth without the risk of fresh garlic burning and turning bitter.
- Neutral Oil: The base of your chili oil, a neutral oil like peanut, vegetable, or canola oil is essential. These oils have a high smoke point and a mild flavor that won't overpower the delicate aromatics and chili notes. Olive oil, for instance, has too strong a flavor and a lower smoke point, making it less ideal for this process.
Our Recommended Ingredient List:
- 3 tablespoons crushed red pepper flakes
- 1 whole cinnamon stick
- 1 whole star anise
- 1 teaspoon Sichuan peppercorns, crushed
- 1/2 teaspoon granulated garlic
- 1 cup neutral oil (e.g., peanut, vegetable, or canola)
Mastering the Art of Chili Oil: A Step-by-Step Guide
The journey to making your own chili oil is straightforward, but one critical factor truly controls the outcome: temperature. Getting the oil temperature right is the key to unlocking layered heat, perfectly toasted aromatics, and a restaurant-level depth in under 30 minutes.
Preparation is Key
- Gather Your Ingredients: Ensure all your spices, garlic, and oil are measured out and within reach.
- Combine Spices: In a heatproof bowl (glass or ceramic works well), combine the crushed red pepper, cinnamon stick, star anise, crushed Sichuan peppercorns, and granulated garlic.
The Golden Temperature Rule
- Heat the Oil Precisely: Pour your neutral oil into a small saucepan. Heat it over medium heat until it reaches between 225°F and 250°F (110°C to 120°C). This usually takes about 3 to 4 minutes. The optimal temperature is crucial:
- Too cool: The oil won't properly extract the flavors and color from the chilis and spices.
- Too hot: The spices will burn, resulting in a bitter, unpleasant taste and potentially a burnt aroma.
You’ll know it’s just right when a few flakes of crushed red pepper sizzle gently when dropped into the oil. For a deeper dive into perfecting your oil heating technique, explore our guide: Master Chili Oil: Unlock Layered Flavor with Perfect Oil Temperature.
The Infusion Magic
- Pour and Infuse: Carefully pour the hot oil directly over the spice mixture in your heatproof bowl. You'll hear a satisfying sizzle as the oil begins its work, infusing the spices with its warmth and extracting their vibrant essences.
- Cool Completely: Let the mixture stand undisturbed until it has cooled completely. This typically takes about an hour, allowing for maximum flavor extraction as the oil slowly cools.
Finishing Touches and Storage
- Strain (Optional): Once cooled, you can choose to strain out the whole spices and chili flakes using a fine mesh sieve for a smoother oil. Many enthusiasts, however, prefer to leave the spices in for added texture and continued flavor development. It's a matter of personal preference!
- Store and Enjoy: Transfer your homemade chili oil to a clean, airtight jar or bottle. Label it with the date. Store it in the refrigerator for up to 6 months. To ensure the best results and extend its shelf life, always use clean utensils when handling the oil. For more detailed instructions and tips on achieving restaurant-quality flavor from scratch, check out: Easy Homemade Chili Oil: Restaurant-Quality Flavor From Scratch.
Elevate Your Chili Oil: Tips for Customization and Culinary Exploration
Once you've mastered the basic recipe for how to make chili oil, the real fun begins. Customization is where homemade chili oil truly shines, allowing you to tailor it to your palate and specific culinary uses.
Beyond the Basics: Regional Variations & Add-ins
Chili oil is a global condiment with countless regional expressions. While our recipe leans towards a classic Sichuan-style with its use of Sichuan peppercorns, star anise, and cinnamon, you can explore other flavor profiles:
- Korean-Inspired: Substitute gochugaru (Korean chili flakes) for a sweet, smoky, and fruity heat. Add fresh minced garlic and ginger during the infusion process.
- Southeast Asian Style: Incorporate lemongrass, shallots, a splash of soy sauce, or black vinegar for a tangy, aromatic brightness that pairs wonderfully with rice dishes and spring rolls.
Other popular additions include bay leaves for extra depth, toasted sesame seeds for nutty flavor and texture, or even fermented black beans for an umami boost. Experiment with different types of dried chilis, such as Arbol for a sharper heat or Guajillo for a milder, fruitier note.
Adjusting Heat Levels
Your homemade chili oil can be as mild or as fiery as you desire. The simplest way to adjust heat is by increasing or decreasing the amount of crushed red pepper flakes. You can also mix different types of chili flakes with varying Scoville heat units to achieve a balanced, multi-layered heat.
Pairing Your Homemade Chili Oil
The versatility of homemade chili oil is astonishing. Once you have a batch ready, you’ll find endless ways to incorporate it into your meals:
- Drizzle it over noodles, dumplings, or wontons.
- Swirl it into soups, stews, or congee for an extra kick.
- Use it as a dipping sauce for spring rolls, potstickers, or bread.
- Elevate simple dishes like scrambled eggs, avocado toast, or roasted vegetables.
- Stir it into stir-fries, marinades, or salad dressings.
- Even a spoonful over pizza or a plain bowl of rice can be a revelation.
Conclusion
Making your own chili oil is a culinary endeavor that promises exceptional rewards. Not only is it remarkably easy and significantly cheaper than store-bought alternatives, but it also offers an unparalleled depth of flavor, freshness, and customization that will truly elevate your home cooking. By following a few simple steps and understanding the critical role of oil temperature, you can create a versatile, aromatic, and perfectly spicy condiment that reflects your personal taste. So, gather your ingredients, take control of your flavor, and embark on the delicious journey of learning how to make chili oil – your taste buds (and your wallet) will thank you!
